Variables#
Usign variables in your Blocks is very easy. Variables allow for the interchange of information between the Flow and the Action of the blocks. Consider variables as parameters that the user can modify during the build of the Flow.
PluginVariable#
In order to define a variable that can be used in the Flow builder you need to instantiate the PluginVariable class. This class has the following parameters:
- class PluginVariable(id: str, name: str, description: str, type: VariableTypes | str, defaultValue: Any | None = None, allowedValues: List[Any] | None = None, category: str | None = None, disabled: bool = False, required: bool = False, placeholder: str | None = None, showInCanvas: bool = False)#
Class that defines a variable that can be used in a PluginBlock.
- Parameters:
name – The name of the variable.
description – A description of the variable.
type – The type of the variable. Assign it using the VariableTypes class.
defaultValue – The default value of the variable.
id – The ID of the variable.
allowedValues – A list of allowed values for the variable.
disabled – Whether the variable is disabled or not
required – Whether the variable is required or not.
This will show the variable in orange when not connected. :param placeholder: The placeholder of the input field. :param showInCanvas: Indicates whether the variable is part of the body of the block.
For example, one may want to define a variable that allows the user to select a PDB structure from the Mol* visualizer. This variable can be defined as follows:
structureVariable = PluginVariable(
    name="Structure",
    id="structure",
    description="Select a molecular structure from Mol*",
    type=VariableTypes.STRUCTURE,
)
VariableTypes#
It is important to correctly define the type of our PluginVariables. The available types are defined in the VariableTypes class:
- class VariableTypes(value)#
The types of variables.
- ANY = 'any'#
Any type of variable.
This type of variable will not render anything, as it is meant to be used as a connection between blocks.
- ATOM = 'atom'#
An atom to be selected from a loaded structure.
Will enable ball-and-stick visualization in Mol* to select the atom.
- BOOLEAN = 'boolean'#
A boolean value. True or False.
Will render as a checkbox.
- BOX = 'box'#
A box to be rendered in Mol*.
Will render as an interactive box viewer. The user can select the center and the size of each side of the box.
This variable will return a dictionary with the following keys:
{
    "metrics": {
        "x0": 0,
        "x1": 5,
        "x2": 0,
        "x3": 0,
        "y0": 0,
        "y1": 0,
        "y2": 5,
        "y3": 0,
        "z0": 0,
        "z1": 0,
        "z2": 0,
        "z3": 5
    },
    "radialSegments": 2,
    "radiusScale": 5,
}
- CHAIN = 'chain'#
A chain to be selected from a loaded structure.
Will render as a dropdown with the list of chains. The type of the variable will be a dictionary with the following keys:
index: The index of the chain in the structure.
name: The name of the chain.
residues: The list of residues in the chain.
structure: The structure object variable where the atom is located.
This last variable contains the properties of the STRUCTURE variable.
- CHAIN_INTERACTIVE = 'chain_interactive'#
A chain to be selected from a loaded structure.
This variant of the chain selection is meant to be used witing Mol*. The user will be allowed to select a specific chain from the loaded structures, not from a dropdown, but clicking directly into the loaded structure. The selected chain will be highlighted.
- CHECKBOX = 'checkbox'#
A checkbox variable. It will render as a list of checkboxes. Multiple can be selected at the same time.
Setup the allowedValues parameter to define the list of options such as [“A”, “B”, “C”].
- CODE = 'code'#
A code variable. This will be rendered as a code editor. The resulting value will be a code snippet as a string.
You can select the language of the code with the allowedValues parameter. For example, for python:
allowedValues = [“python”]
- CONSTRAINED_NUMBER_RANGE = '[number, number, number, constrain]'#
A range of numbers like 1-10.
Can be made an Integer range or a Float range depending on the step.
Will render as a slider with tho dragging handles. Used to define a range between to points. Use allowedValues to define: [min, max, step].
The first number in the list is the minimum value.
The second number in the list is the maximum value.
The third number in the list is the step.
Will return two numbers, one for each handle.
- CUSTOM = 'custom'#
A custom variable. It can contain any type of data but allows connections only from other custom variables that contain the same strings inside the allowedValues list. Just like ANY, it will not render any input field.
For example, a custom variable with allowedValues = [“A”, “B”, “C”] can be connected to another custom variable with allowedValues = [“B”]
- FILE = 'file'#
A file.
On the server: Will open the server file explorer.
On the desktop: Will render as a system file picker.
- FLOAT = 'float'#
A floating point number like 1.0, 2.5, 3.1415…
Will render as a number input with increment/decrement buttons. Accepts only floats.
- FOLDER = 'folder'#
A folder.
On the server: Will open the server file explorer.
On the desktop: Will render as a system folder picker.
- HETERORES = 'heterores'#
A hetero residue to be selected from a loaded structure.
Will render as a list of hetero residues. The type of the variable will be a dictionary with the following keys:
index: The index of the residue in the structure.
name: The name of the residue.
atoms: The list of atoms in the residue.
structure: The structure object variable where the atom is located.
This last variable contains the properties of the STRUCTURE variable.
- INTEGER = 'integer'#
An integer number like 1, 2, 3…
Will render as a number input with increment/decrement buttons. Accepts only integers.
- LIST = 'list'#
VariableList will be automatically converted to a list of variables.
Will render as a table with an input field and an add button.
- MULTIPLE_STRUCTURE = 'multiple_structure'#
Multiple molecular structures to be selected from Mol*.
Will render as a list of checkboxes with the list of loaded structures. The type of the variable will be a list of dicts with the following data:
id: The ID of the structure.
name: The name of the structure.
type: The type of the structure (CIF, PDB…).
structure: The structure file contents (CIF, PDB… string)
- NUMBER = 'number'#
A number like 1, 2.5, 3.1415…
Will render as a number input with increment/decrement buttons.
- NUMBER_LIST = 'number[]'#
A list of numbers like [1, 2.4, 3.1415].
Will render as a dropdown.
- NUMBER_RANGE = '[number, number, number]'#
A range of numbers like 1-10.
Can be made an Integer range or a Float range depending on the step.
Will render as a slider. Use allowedValues to define: [min, max, step].
The first number in the list is the minimum value.
The second number in the list is the maximum value.
The third number in the list is the step.
- OBJECT = 'object'#
An object variable. This will be rendered as a code editor. The resulting value will be a python dictionary. Must be JSON serializable.
- PASSWORD = 'password'#
A password variable. It will render as a password input field. The resulting value will be a string.
- RADIO = 'radio'#
A radio variable. It will render as a list of radio buttons. Only one can be selected at a time.
Setup the allowedValues parameter to define the list of options such as [“A”, “B”, “C”].
- RESIDUE = 'residue'#
A residue to be selected from a loaded structure. Either a standard or non-standard residue.
- RESIDUE_RANGE = 'residue_range'#
A residue range to be selected fro ma loaded structure.
Will enable residue selection. Two residues need to be selected. The starting one, and the ending one. A range will be automatically selected an visualized within Mol*.
- SMILES = 'smiles'#
A list of molecule SMILES strings.
Will use the loaded molecules in the JSME viewer (https://jsme-editor.github.io/)
- SPHERE = 'sphere'#
A sphere to be rendered in Mol*.
Will render as an interactive sphere viewer. The user can select the center and the radius of the sphere. The type of the variable will be a dictionary with the following keys:
center: The center of the sphere as a list of floats [x, y, z].
radius: The radius of the sphere as a float.
- STDRES = 'stdres'#
A standard residue to be selected from a loaded structure.
Will render as a dropdown with the list of standard residues. The type of the variable will be a dictionary with the following keys:
index: The index of the residue in the structure.
name: The name of the residue.
atoms: The list of atoms in the residue.
structure: The structure object variable where the atom is located.
This last variable contains the properties of the STRUCTURE variable.
- STRING = 'string'#
A regular string like “Hello world”.
Will render as a text input.
- STRING_LIST = 'string[]'#
A list of strings like [“Hello”, “World”].
Will render as a dropdown.
- STRUCTURE = 'structure'#
A single molecular structure to be selected from Mol*.
Will render as a list of radio buttons with the list of loaded structures. The type of the variable will be a dict with the following data:
id: The ID of the structure.
name: The name of the structure.
type: The type of the structure (CIF, PDB…).
structure: The structure file contents (CIF, PDB… string)
- TEXT_AREA = 'text_area'#
A large text like a paragraph, can contain multiple lines.
"Hello world \n Hello planet".Will render as a text input.
- static getTypes()#
Returns a list of all the available types.
For array types, such as STRING_LIST (dropdown), you need to specify the allowed values in the allowedValues parameter. For example:
favoriteColor = PluginVariable(
    name="Favorite color",
    id="favcolor",
    description="Select your favorite color",
    type=VariableTypes.STRING_LIST,
    allowedValues=["Red", "Green", "Blue"],
)
For the LIST type, you can specify the type of the elements of the list using the allowedValues parameter. Only the first allowedValue will be used. If none provided, the LIST will fallback to VariableTypes.STRING.
inputlistWithAllowedValues = PluginVariable(
    name="Residue indices",
    id="values",
    description="A list with numbers to be used as an input.",
    type=VariableTypes.LIST,
    allowedValues=[VariableTypes.NUMBER],
)
This will render a table in the Flow builder with a dynamic number of elements, with each one being of the allowedValues type. The variable returns an array of the form: [value1, value2…].

VariableGroup#
Variables can be grouped together using the VariableGroup class. This is intended for Blocks that work with different sets of inputs.
- class VariableGroup(id: str, name: str, description: str, variables: List[PluginVariable], allowedValues: List[Any] | None = None, category: str | None = None, disabled: bool = False, required: bool = False, showInCanvas: bool = False)#
A group of variables to be used together as input.
Initialize a VariableGroup
- Parameters:
id – The ID of the variable group (must be unique).
name – The name of the variable group.
description – A description of the variable group.
variables – The list of variables in the group.
allowedValues – In this case, the allowed values will indicate in
the GUI which groups can be connected (with the same allowedValues) :param disabled: This will set all the variables under the group as disabled
For example, a PELE simulation may require the input data for the protein and the ligand, which can be grouped together in a complex or separated in their respective files. In this case, the VariableGroup class can be used to group these two different types of inputs:
ligandFileInput = VariableGroup(
    id="ligandFileInput",
    variables=[
        system_data_input,
        ligand_data_input_file,
    ],
)

ligandSelectionInput = VariableGroup(
    id="ligandSelectionInput",
    variables=[
        complex_data_input,
        complex_ligand_selection_input,
    ],
)
The VariableGroup class has then to be assigned to the inputGroup parameter of a Block.
When running a Block action, the selected group can be accessed using the selectedInputGroup property of the Block class:
def blockAction(block: SlurmBlock):

    selectedGroup = block.selectedInputGroup # Either "ligandFileInput" or "ligandSelectionInput" in our example
VariableGroup can also be assigned to a regular Block variable. In this case, the returned value will be a dictionary with the ids of the variables as keys and the values as values. For example:
myObjectVariable = VariableGroup(
    id="myObjectVariable",
    name="My object variable",
    description="A variable that contains a group of variables",
    variables=[
        complex_data_input,
        complex_ligand_selection_input,
    ],
)

def blockAction(block: SlurmBlock):

    value = block.variables["myObjectVariable"] # {"complex_data_input": "complex.pdb", "complex_ligand_selection_input": "LIG"}
On render, the variable groups appear as regular PluginVariable, but with the inner variables grouped together.
VariableList#
Besides from the simple VariableTypes.LIST type, there is also the VariableList class.
- class VariableList(id: str, name: str, description: str, prototypes: List[PluginVariable], defaultValue: list[dict] | None = None, allowedValues: List[Any] | None = None, category: str | None = None, disabled: bool = False, required: bool = False, showInCanvas: bool = False)#
A list of the designed input variables.
- Parameters:
id – The ID of the variable.
name – The name of the variable.
description – A description of the variable.
prototypes – The list of variables in each row of the list.
allowedValues – Matching allowedValues in other variables will indicate in the GUI which variables can be connected.
disabled – Will set all variables under the list as disabled.
required – Will set all variables under the list as required.
This class offers more flexibility. In the case of VariableTypes.LIST, only string values, along with an optional dropdown for allowedValues is available. VariableList allows for the definition of a list of variables of any type. For example:
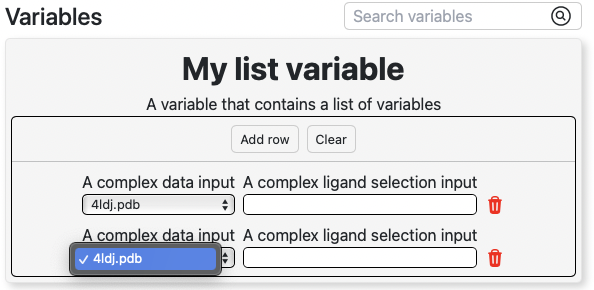
myListVariable = VariableList(
    id="myListVariable",
    name="My list variable",
    description="A variable that contains a list of variables",
    prototypes=[
        complex_data_input, # VariableTypes.STRUCTURE
        complex_ligand_selection_input, # VariableTypes.STRING
    ],
)
Notice the prototypes parameter. This parameter defines the variables that will be used in the list. On render, it will show like this:
Custom variables#
If more customization is needed during the configuration of a variable, the CustomVariable class is available. This class allows for the definition of a custom renderer for the variable. For example, some variables of a particular block may require extensive preparation that is not possible to do in the Flow builder. For example, in the preparation of a protein for a simulation, the user may want to select the residues that will be mutated, or select a set of residues from a model folder. This can be done using the CustomVariable class. The type parameter of the class will be used to determine to which other variables the custom variable can be connected in the Flow builder, just like a regular PluginVariable. For example:
customRenderPage = PluginPage(
id="custom_render_page",
name="Custom render page",
description="Custom render page",
html="customrender.html",
hidden=True,
)
plugin.addPage(customRenderPage)
// Setting type to custom so that the output can be connected to 'Number' variables
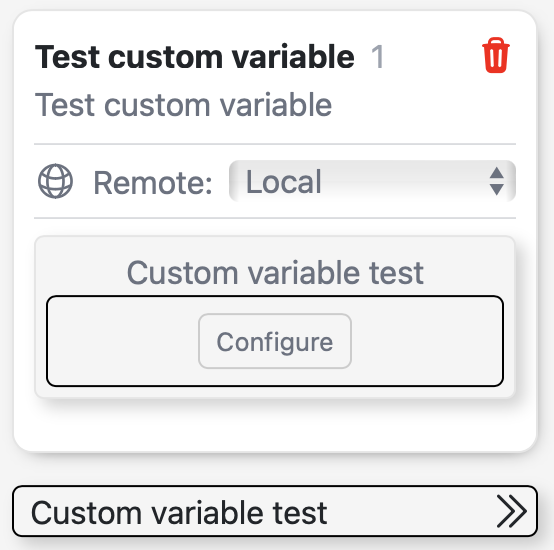
customVariable = CustomVariable(
id="custom_variable",
name="Custom variable",
description="Custom variable",
customPage=customRenderPage,
type=VariableTypes.NUMBER,
category="Custom variables",
)
The variable will be rendered as a “Configure” button which will open the specified PluginPage. For more information about PluginPage, refer to the Extensions section.
Inside the custom view, the variable and the flow can be accessed in JavaScript using the window.horusVariable object.
Warning
The window.horusVariable object is only available inside the view of a CustomVariable.
For the flowChanged event, attach the listener to the parent window, not the current one, since extensions run inside iframes and the event is only dispatched on the parent window.
// Get the current state of the variable which opened the custom view
const variable = window.horusVariable.getVariable();

// Set a new value for the variable
window.horusVariable.setVariable("new_value");

// Get the current state of the flow
const newFlow = window.horusVariable.getFlow();

// For example, modify the title of the flow
newFlow.title = "New title";

// Set a new value for the flow
window.horus.setFlow(newFlow)

// Obtain an updated value from the flow when it is modified
// using an event listener on the PARENT window
parent.addEventListener("flowChanged", (event) => {
    const flow = event.detail;
    console.log("Flow changed", flow);
});

// You can execute the flow using the executeFlow function
await window.horus.executeFlow({
    placedID: 1, // Mandatory, the ID of the block to be executed
    resetFlow: true, // Optional, whether to reset the flow before executing
    continueSlurm: false, // Optional, whether to continue the Slurm execution
});
More information about extensions can be seen at Extensions section.